
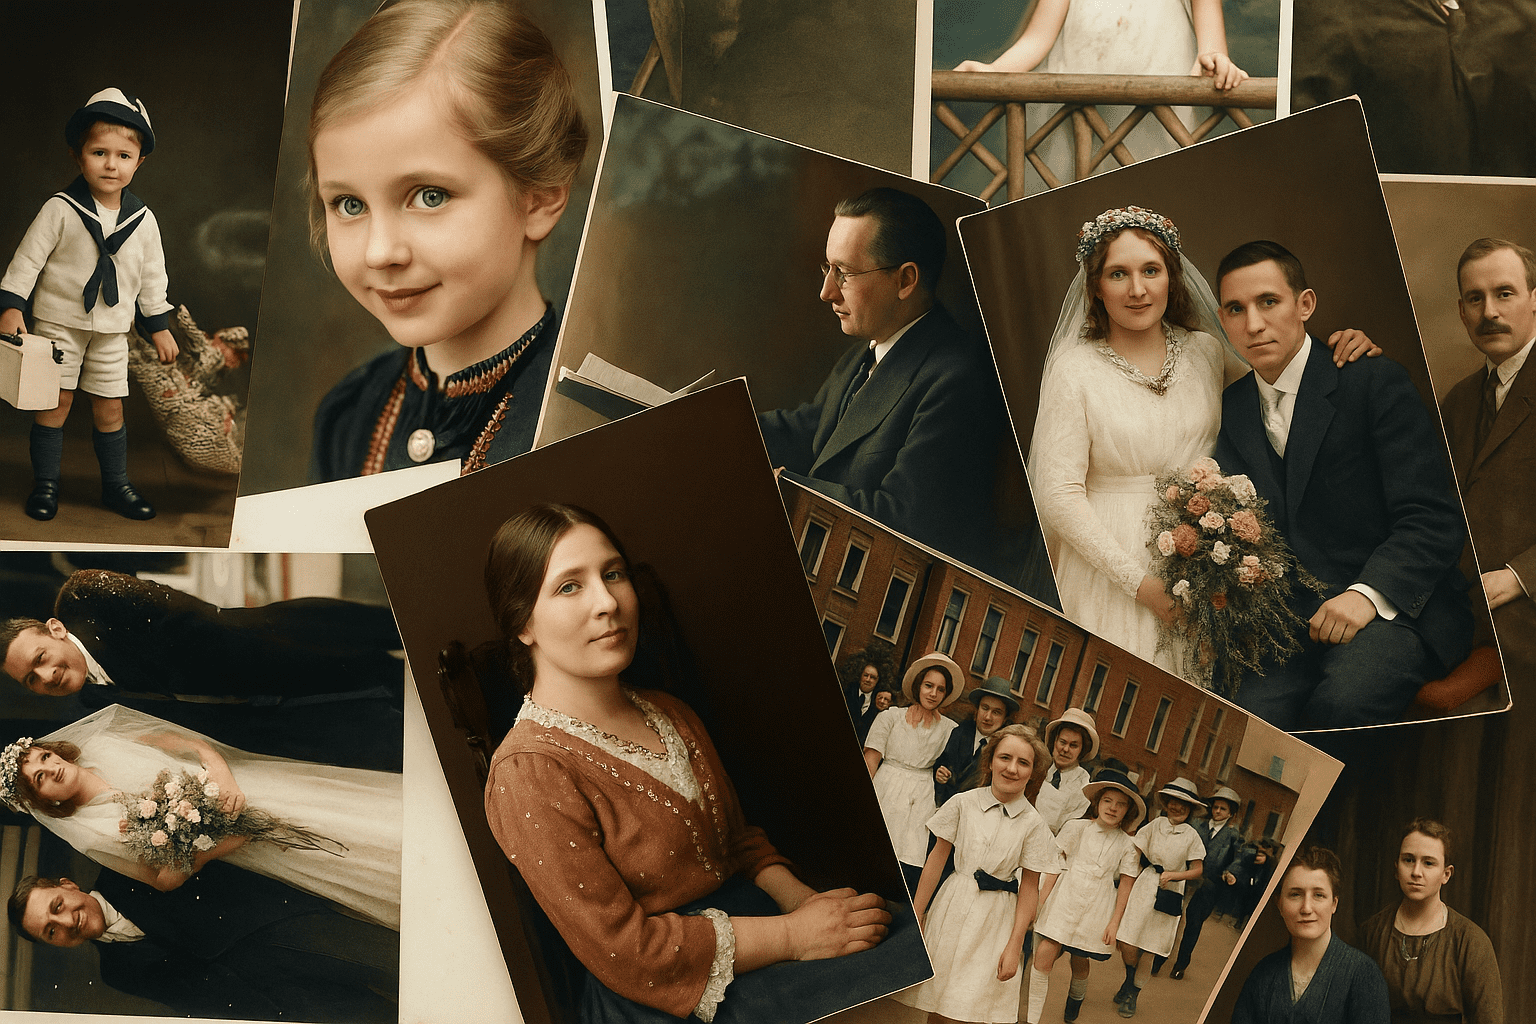
Preserving family memories and priceless photographs has never been easier, thanks to the latest advances in AI-powered photo restoration. Whether you’re a professional photo restorer or a parent digitizing a box of vintage family photos, GPTImage.ai’s advanced restoration workflows and modern image models bring faded, damaged prints back to life in just a few clicks. In this guide, we’ll show you how to use GPTImage.ai for old photo restoration with AI, walking through each step of the process. You’ll learn how to prepare and upload your images, apply AI-driven enhancements, and finally save and preserve your newly restored images for future generations. By the end of this article, you’ll feel confident using GPTImage.ai to restore vintage photos online and transform aged snapshots into stunning high-quality images.
GPTImage.ai is a web-based platform that supports modern image workflows across multiple advanced models, including GPT-4o Image and GPT Image 2, making AI photo restoration fast, easy, and accessible to everyone. You don’t need any specialized software or experience – all you need is a web browser. With intuitive controls and powerful AI features, GPTImage.ai can automatically remove scratches and dust, repair tears, colorize black-and-white images, sharpen details, and even intelligently fill in missing pieces. The result is a photo that looks as if it were just taken yesterday. Let’s dive in and see how you can harness GPTImage.ai’s AI tools to breathe new life into your old photos.
Why Choose AI for Old Photo Restoration?
Restoring a vintage or damaged photo by hand can be time-consuming, expensive, and requires specialized skills in tools like Photoshop. Today’s AI-driven photo restoration tools, such as GPTImage.ai, offer a powerful alternative that can save you hours of manual editing. Instead of retouching every scratch and adjusting color channels yourself, you can let AI analyze the image and apply fixes across the entire photo automatically. GPTImage.ai’s advanced restoration workflows understand the context of an image – for example, recognizing faces, clothing, backgrounds, and more – so they can make smart decisions about how to enhance and repair it.
- Automatic Repair: AI algorithms can automatically detect and remove common flaws like dust spots, scratches, creases, and tears. This removes the need to meticulously clone out damages pixel by pixel.
- Color Correction: For faded color photos or black-and-white pictures that need colorization, GPTImage.ai can adjust colors and lighting based on modern reference data. This means outdated, yellowed photos can be restored to bright, natural tones.
- Enhanced Detail: When you scan old photos, they often come in at low resolution. GPTImage.ai’s AI upscaling capabilities can increase resolution and sharpen details, making faces and objects look clearer.
- Speed and Convenience: Instead of spending days editing an image, AI can complete complex restorations in minutes. And because GPTImage.ai is web-based, there’s no software to install – just upload your photo and let the AI work its magic.
By using AI for photo restoration, you get professional-quality results with minimal effort. It’s like having a digital photo lab and an image expert in one service. GPTImage.ai’s ease-of-use means both seasoned photo restorers and casual users can achieve fantastic results. In the sections below, we’ll talk about why GPTImage.ai stands out as the ideal choice for this task and then walk through the exact steps to restore your old photos.
Why Choose GPTImage.ai for AI Photo Restoration?
GPTImage.ai isn’t just any online photo editor – it’s built on modern multimodal image models and restoration-ready workflows to deliver cutting-edge results. Here’s why GPTImage.ai is an excellent choice for restoring vintage photos:
- State-of-the-Art AI Engine: GPTImage.ai uses modern OpenAI image workflows, including GPT-Image-1 and related multimodal image models. These systems are trained on large datasets of images and text, enabling them to understand complex prompts and generate high-fidelity results. When you tell GPTImage.ai to fix an old photo, it applies that intelligence to analyze and recreate missing details.
- High-Quality Results: As highlighted on our homepage, GPTImage.ai produces professional-grade images with sharp details and vibrant colors. Even if your original photo is blurry or small, the AI can upscale and enhance it so the restored version looks crisp and clear.
- Lightning-Fast Processing: Thanks to powerful servers and optimized algorithms, GPTImage.ai completes restoration tasks in minutes. No more waiting around for slow software renders. This is especially helpful for professionals handling large batches of photos or families eager to see results quickly.
- User-Friendly Interface: No tech skills are required. GPTImage.ai’s web interface is designed to be intuitive for everyone. You simply upload your image, enter a descriptive prompt, and click a button to let the AI do the rest. The step-by-step process is straightforward, making it easy for first-time users.
- Customizable Prompts: You have control over how the AI restores your photo. By adjusting the text prompt, you can emphasize certain tasks (e.g., “remove scratches,” “enhance facial features,” “colorize black and white photo”) to tailor the output. GPTImage.ai even supports up to 5 reference images, so you could provide similar restored images as examples if needed.
- Versatile Style Support: While your goal is realistic restoration, GPTImage.ai can accommodate artistic styles if desired. For example, if you want a restored photo to have a film-like color tone or a black-and-white cinematic feel, you can specify that in the prompt. However, for most restorations, the AI’s default realistic approach yields the best results.
- Built for Restoration Projects: Many restoration tools focus on just one aspect (like colorization or denoising). GPTImage.ai’s full-stack AI means it can tackle all aspects in one go: from spotting noise and texture issues to understanding scene elements and face details. This unified approach often gives a more cohesive restored image.
In short, GPTImage.ai combines powerful AI tech with an easy interface. It’s the perfect tool whether you’re a professional photo restorer who needs to speed up your workflow, or someone who just wants to preserve old family memories. The next sections will guide you through preparing your photos and using the platform step by step. If you need more details about the platform’s capabilities, check out our GPTImage.ai homepage and explore the features section. You can also find other creative guides in our Tutorials section.
Preparing Your Old Photos for Restoration
Before you start using GPTImage.ai, it’s important to prepare your vintage photos properly. The better the quality of the input image, the better the AI’s results will be. Here are some tips for preparing your photos:
- Scan at High Resolution: If your photo is a printed photograph, first scan it using a high-quality scanner. Aim for a resolution of at least 600 DPI (dots per inch) for small photos, or higher for larger prints. Scanning at high resolution ensures the AI has more detail to work with. Save scans in a lossless format like PNG or TIFF if possible, although JPEG at maximum quality also works.
- Clean the Physical Photo: Gently clean the surface of the photo with a soft, dry cloth before scanning, to remove dust or smudges. This reduces the amount of noise the AI has to fix.
- Crop and Straighten: Use basic photo software to crop out any unwanted background or borders and straighten the image. You want the focus to be entirely on the photo itself. GPTImage.ai will perform best when the subject of the photo is centered and fills most of the frame.
- Convert Text to Digital: If the old photo contains handwritten notes, dates, or labels, GPTImage.ai can often recognize and retain this text during the image restoration process. In many cases, legible text will be regenerated as part of the restored photo. For historical accuracy, you may also verify and optionally edit the text afterwards to ensure it matches the original details.
- Optional: Denoise First: If you scanned the photo in a very low-light or noisy environment, consider running a quick noise reduction filter with free photo software (like simple filters built into cameras or phones) before uploading. This gives GPTImage.ai cleaner data to start with.
- Identify Key Issues: Look at your photo and note its main problems (faded colors, scratches, tears, etc.). You’ll mention these in the next step when you give a prompt to the AI. The more specific you are about what needs fixing, the better the result.

Once your photo is scanned and ready as a digital file, you’re all set to use GPTImage.ai. In the next section, we’ll go through each step of the restoration process, including uploading the image, choosing options, and retrieving your final restored photo.
Step-by-Step Tutorial: Restoring Your Photo with GPTImage.ai
Now let’s walk through the full restoration process on GPTImage.ai, step by step. Follow these instructions to transform your old or damaged photo into a vibrant, restored image. We’ll include example screenshot placeholders to guide you through the interface at each stage.
Step 1: Access GPTImage.ai and Upload Your Photo
First, open your web browser and go to GPTImage.ai. You don’t need to download any software – the service works entirely online. If you haven’t already created an account, you can try the tool without one, but signing up will help you to get more benefits.
- Navigate to the Image Generator. On the homepage, you’ll see the image upload and prompt interface.
- Select Your Image File. Click on the upload area. In the file chooser, locate the scanned photo on your computer and select it. GPTImage.ai supports JPG and PNG formats, as well as pasting a URL if your image is hosted online.
- Wait for the Upload. The site will show a thumbnail of your photo once it’s uploaded.
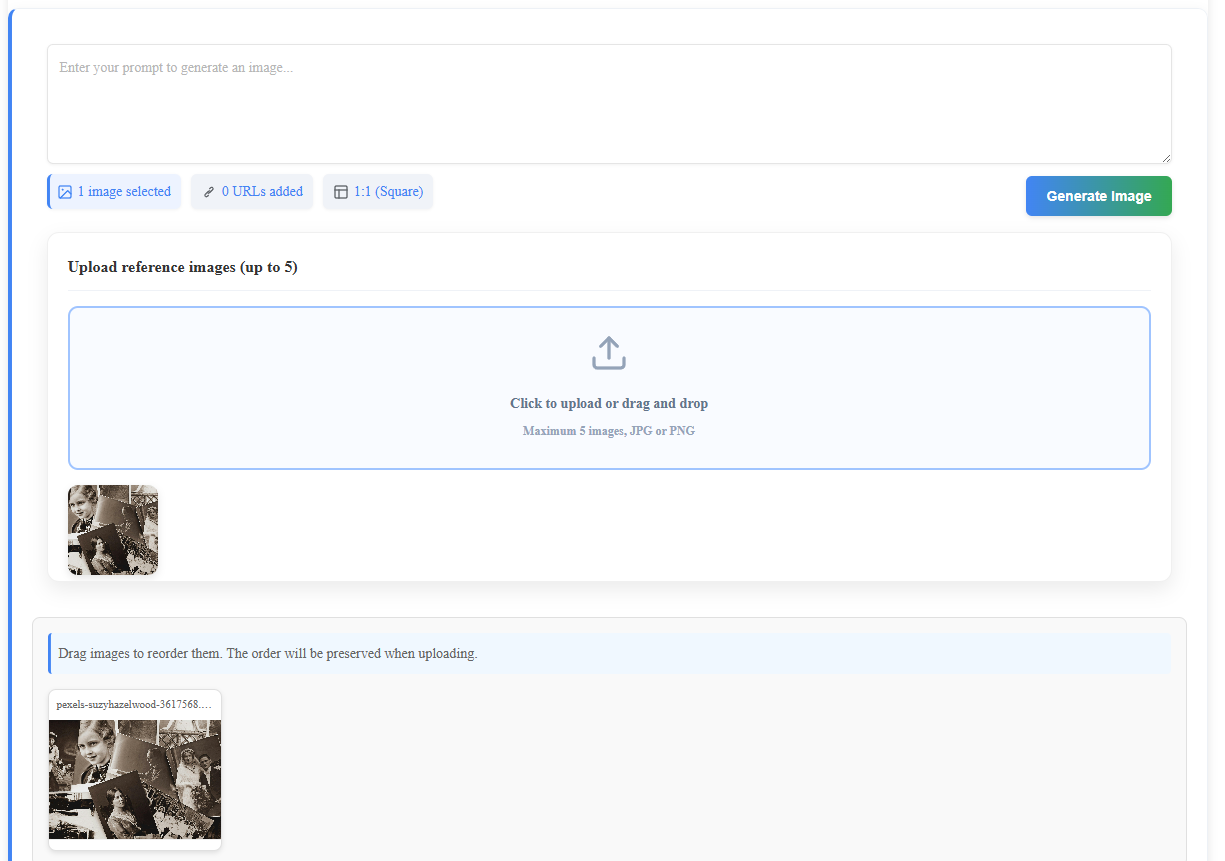
When your photo appears in the upload area, you’re ready for the next step. Notice any hints or tooltips on the page about maximum file size or resolution. If your photo was very large, you might need to scale it down just slightly (GPTImage.ai will often do this automatically) to meet the size limits. In general, keeping your image under a few megapixels ensures fast processing.
Step 2: Enter a Restoration Prompt or Choose AI Style
GPTImage.ai works by interpreting text prompts to guide the AI on what to do with your image. For photo restoration, you’ll describe the kind of enhancements you want. The AI will then apply its algorithms to fulfill your request. Here’s how to do it:
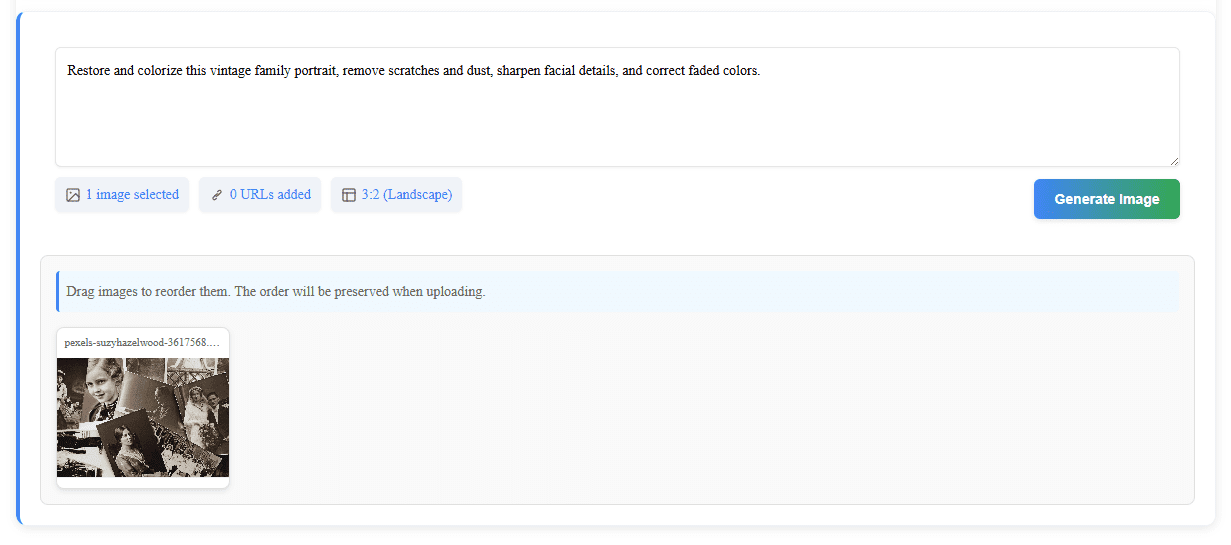
- Focus on Clarity. In the prompt box, enter a clear instruction. For example:
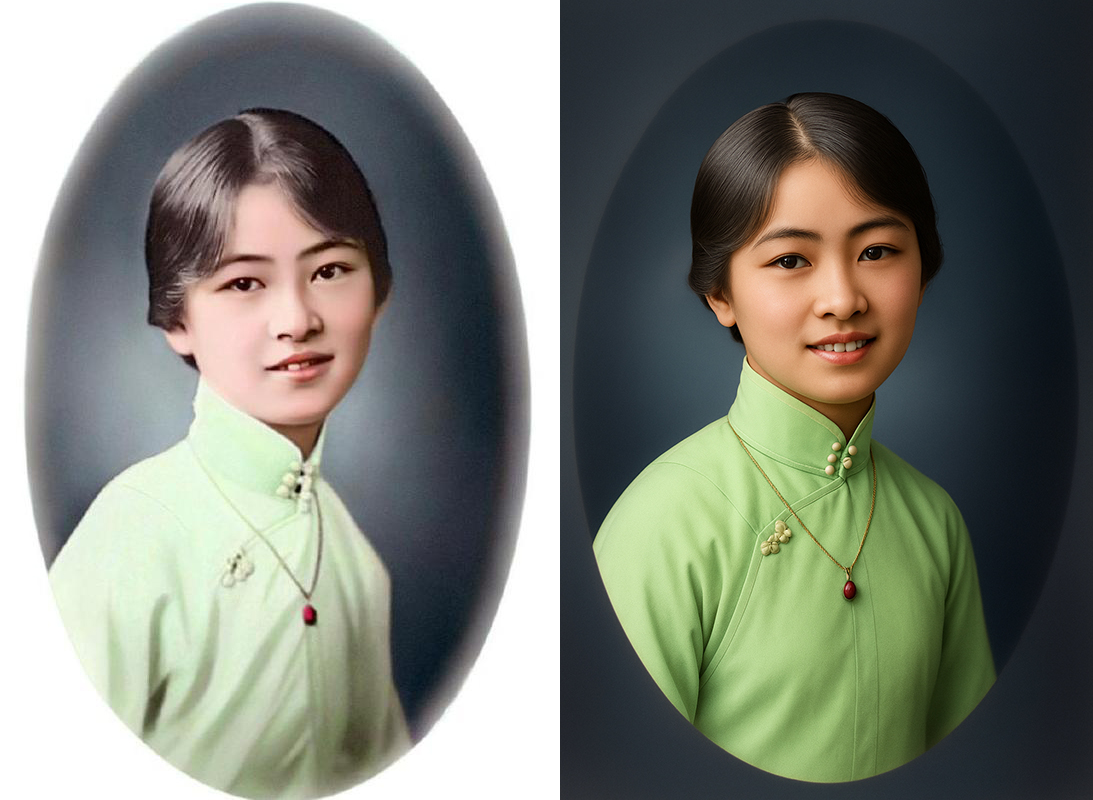
“Restore this old black-and-white photo of a family, remove scratches, enhance faces, and colorize it naturally.”
Be as specific as needed about the elements you want fixed. You can mention scratches, tears, dust, fading, or colorization explicitly. - Use Simple Language. GPTImage.ai’s model understands natural language, so you don’t need technical terms. Phrases like “remove dust and scratches” or “make the colors vivid again” work well. If your photo has multiple issues, list them (e.g., “repair torn edges, remove red-eye, increase contrast”).
- Set Style Preferences (Optional). If your photo is black-and-white and you want to keep it that way, say “restore and sharpen in black and white.” If you want a colorized result, mention it. You can even specify an era style (like “make it look like a modern HD photo”) or a mood (“warm and nostalgic color tones”). However, for straightforward restoration, the default “photorealistic” style is usually best.
- Choose Aspect Ratio. GPTImage.ai lets you choose the aspect ratio for the output. If you want to keep the original framing, select the same aspect ratio as your photo (common ratios are 2:3, 3:2, or square). This ensures the AI doesn’t crop out important parts of the image.
For example, a complete prompt might be:
“Restore and colorize this vintage family portrait, remove scratches and dust, sharpen facial details, and correct faded colors.”
Once your prompt reads how you want, it’s time to run the AI.
Step 3: Run the AI Restoration
With your photo uploaded and prompt entered, now you initiate the AI process:
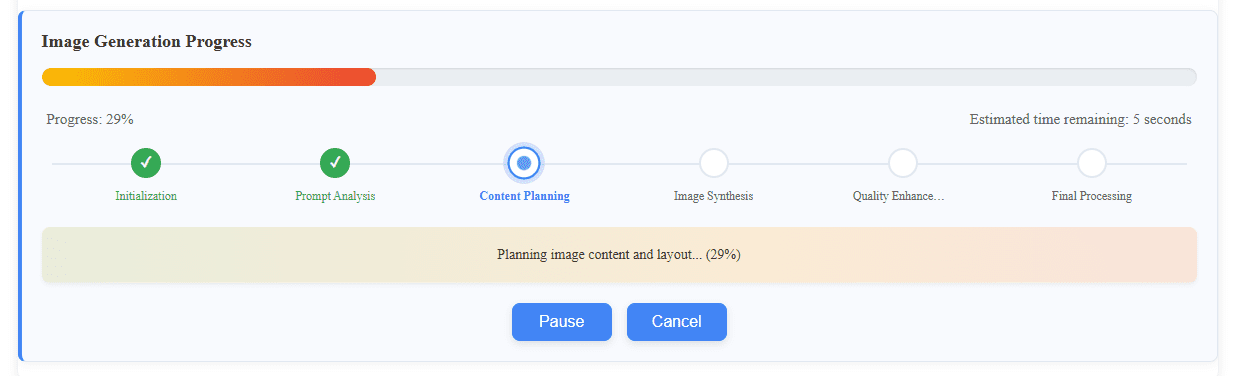
- Start Generation. Click the “Generate Image” button on the interface. This tells GPTImage.ai to begin processing your image according to the prompt.
- Monitoring Progress. A progress bar or spinner will indicate that the AI is working. Depending on the chosen quality and server load, this could take anywhere from a few minutes. During this time, the AI is analyzing your photo’s content and beginning to apply enhancements.
- View Results. Once complete, GPTImage.ai will display the restored image on the page.
At this point, you should see the preliminary results. The new image should show improvements: colors may be adjusted, scratches removed, and details sharper. If something doesn’t look right, don’t worry – you can refine it.
Step 4: Refine the Output (If Needed)
AI tools are powerful, but sometimes the first output can use a little tweaking. GPTImage.ai makes it easy to adjust as needed:
- Compare with Original. Look closely at the restored image and compare it to the original. Notice any issues that remain, such as leftover scratches, odd color areas, or missing details.
- Edit the Prompt. If the result is close but not perfect, tweak your prompt and run it again. For example, you might add emphasis like “focus more on skin tone correction” or “reduce over-saturation”. Small changes in wording can yield different results.
- Use Multiple Attempts. You can regenerate multiple times. Each time, the AI might produce a slightly different output. Choose the version that looks best, or combine elements by saving different outputs.
- Combine Outputs. For very damaged photos, you could run the restoration twice, each focusing on different issues (e.g., one pass for scratch removal, another for colorization) and then composite them using any photo editor. This is an advanced technique but can yield great results.
If, after a couple of attempts, the image still isn’t right, it could be due to extremely damaged input. In that case, try cleaning up the image manually (or in Photoshop/GIMP) to remove major tears and then re-run the AI on the cleaned version. However, for most photos, GPTImage.ai should handle the majority of common issues automatically.
Once you are satisfied with the restored image, it’s time to save it.
Step 5: Save and Download Your Restored Photo
After the AI has generated a final version you like, you’ll want to save the image to your computer:
- Preview the Final Image. Ensure the final version on the screen is exactly what you want. Zoom in to check details like faces, edges, and background elements.
- Use the Download Option. GPTImage.ai provides a download button or link. Click “Download” to save the image.
- Rename the File. Optionally, save with a new name like “FamilyPhoto_Restored.png” so it’s clear this is the restored version.
- Backup the Original. Always keep a copy of the original scan in your archives. You never know if you’ll want to re-run the process later with different settings.
- Verify Color Profile. Sometimes colors can shift when transferring between programs. Open the downloaded file on your computer to make sure it looks as expected.
Congratulations! You’ve just restored your old photo using GPTImage.ai’s AI tools. The image on your computer should now be brighter, clearer, and free of the age-related damage that the original had.
Additional Tips for Best Results
- Use Multiple Reference Photos: If you have other photographs of the same subject or time period, you can upload them as references (GPTImage.ai allows up to 5 images). This helps the AI understand the correct color tones or background details. For example, if you have a color snapshot of a person from the same era, it can guide the colorization process.
- Iterative Prompting: Don’t be afraid to experiment with prompt phrasing. AI models can sometimes respond unexpectedly to certain words. If “remove scratches” didn’t fully fix them, try “clean up scratches” or “reconstruct torn parts”.
- Focus on One Task at a Time: If your photo has many issues (color fading, plus scratches, plus a tear), try handling one issue at a time. For example, first run a pass with “remove dust and scratches” without mentioning color. Then take that output and run another pass specifically for colorization. Breaking it into steps can sometimes yield better control.
- Mind the Cropping: Watch out for any unwanted cropping by the AI. If you notice important parts of the photo are getting cut off, you might need to pad the image before uploading or adjust the aspect ratio.
- Check for Hallucinations: AI is powerful, but it can occasionally “hallucinate” details (like adding objects or textures that weren’t there). Make sure any changes are realistic. If the AI invents something strange (like an arm growing an extra finger or a tree appearing where none was), adjust the prompt to discourage that, or do a quick manual fix.
- Colorize Thoughtfully: When colorizing black-and-white images, GPTImage.ai tries to guess natural colors. It may not get skin tones exactly right on the first try. You can specify clothing colors (“put the dress in a pale blue”), or if skin looks too red or yellow, say “reduce redness in skin tones” in a follow-up prompt.
- Use Neutral Lighting: If the lighting in the photo was uneven (e.g., part in deep shadow), mention it. A prompt like “brighten the dark areas while keeping the bright areas natural” can help. The AI’s goal is usually balanced lighting.
- Professional Settings: For pros, remember that GPTImage.ai can process high-resolution images. If you scanned a photo at very high DPI, the site can handle detailed restoration and even allow you to zoom in on microscopic damage. This is a huge time saver compared to manual retouching.
- Experiment with Styles: Once your photo is restored, you could even create variations: one in vintage sepia tone, another in full color, etc. Just change your prompt’s style instructions (“convert to warm sepia”) to get different versions.
By using these tips, you’ll get cleaner, more accurate restorations. Remember that every photo is different: the AI’s power comes from its flexibility. Feel free to play around with the settings and prompts until it matches your vision.
Saving, Printing, and Preserving Your Restored Images
Restoring the photo is half the journey – now you’ll want to ensure your newly vibrant image is preserved safely and maybe even printed. Here are best practices for saving and sharing your restored photo:
- High-Resolution Backups: Keep at least one copy of your restored image at the highest resolution you can. Preferably, save it as a PNG or TIFF without compression artifacts. Store these files on your computer’s hard drive and in a backup location (like an external drive or cloud storage). This ensures you always have the best master file.
- Use the Right File Format: For archival purposes, use lossless formats (PNG or TIFF). If you plan to share on social media or email, you can also save a JPEG version, but choose a high-quality setting (90%+ JPEG quality) to avoid visible compression.
- Embed Metadata: If possible, use photo management software to embed metadata (like the date of the photo, original photographer, or restoration date). This can be useful for future reference. Some cameras or scanner software add EXIF data during scanning; double-check it for accuracy.
- Print with Care:
- Choose a reputable photo printing service that can print at high quality. Many online labs allow you to upload your image.
- Ensure the image’s resolution is high enough for the print size. For example, for a 10×8 inch print, aim for at least 300 DPI (so 3000×2400 pixels).
- Consider printing on archival-quality paper to make it last longer.
- Preview the print in soft proof mode on your monitor if you have color calibration tools, to ensure color accuracy.
- Create Multiple Copies: Don’t rely on a single print or digital copy. Digital files can be backed up in multiple places (cloud storage like Google Drive, Dropbox, etc., as well as local drives). Physical photos can fade or get damaged over decades. Store printed photos in archival sleeves or albums in a cool, dry place.
- Share with Family: Email or social media sharing of the restored photo can be a great way to preserve memories across generations. Make sure to share a high-resolution version, not just a thumbnail, so family members can appreciate the details.
- Maintain Originals: Keep the scanned original file safe too. You might want to try different restoration approaches in the future. Label it clearly (e.g., “Family_1943_Original_Scan.jpg”) so you always know what it is.
- Future Proofing: Technology changes, so consider keeping a note of how the photo was restored (e.g., a text file or in the metadata: “Restored with GPTImage.ai, version March 2025”). This historical note can be interesting later on.
- Follow Up on Software Updates: As AI tools improve, future versions of GPTImage.ai may do even better. It could be worth running your old photos through the tool again in a year or two to see if any new capabilities improve the result further.
By taking these steps, you ensure that your restored photo is preserved just as well as the memories it represents. Whether it’s hanging on a wall, stored in a digital photo frame, or kept in a family archive, your enhanced photo will continue to bring joy.
Ready to give your photos new life?
Old photographs hold priceless memories of the past, and with today’s AI tools you can preserve them more easily than ever. GPTImage.ai’s AI-powered restoration features make it simple to restore vintage photos online with professional-quality results. As we’ve seen, the process is straightforward: prepare your scan, upload it, describe how you want it improved, and let the AI work its magic. In just a few minutes, you can go from a faded, scratched print to a bright, vivid image that looks almost brand new.
Whether you’re a professional photo restorer looking to streamline your workflow, or a family member hoping to digitize and enhance Grandpa’s old prints, GPTImage.ai provides an intuitive platform for the job. Its powerful model lineup and restoration workflows deliver high-fidelity, realistic outcomes, while the user-friendly interface lets anyone accomplish complex edits without prior training. After restoration, remember to save multiple backups, consider printing archival-quality copies, and share your restored photos proudly with loved ones.
Ready to give your photos new life? Visit the GPTImage.ai homepage to try out the restoration tools today. You can explore more guides in our Tutorials section, and stay updated on new AI features in our News page. With GPTImage.ai, turning old, damaged photos into fresh memories is just a few clicks away. Happy restoring!